Opencloud DaaS Application Server Templates
This section will cover the basics of creating an OVD Application Server template for use in Opencloud DaaS.
Windows Server Template
Pre-requisites/Assumptions
Please consider the following before proceeding:
- The Windows Server RD Session Host role is required to install the OVD Application Server service.
- If RDS CALs are required, it is recommended to deploy an RDS Licensing server elsewhere in the environemnt.
- Current supported versions are Windows Server 2012 R2 With Extended Support, Server 2016, Server 2019, and Server 2022.
- Currently, it is only supported to have a template with a single disk.
- The system must be sysprepped as the very last step before being converted to a template, so you must use scripts (either locally or initiated via userdata in Opencloud) if it is desired to join the template to an AD domain on instantiation.
- This guide assumes you have already configured Opencloud DaaS Provisioning
- Ensure that the following traffic is allowed through the Windows firewall:
The Powershell commands below will allow this traffic:
Inbound - TCP 1112 (HTTP): for communication with the OVD Session Manager - TCP 3389 (RDP): for communication with the OVD Enterprise Secure Gateway, OVD Web Access and end user's browser Outbound - TCP 1111 (HTTP): for communication with the OVD Session Manager - TCP 445 (CIFS): for communication with the OVD File Server# Inbound rules New-NetFirewallRule -DisplayName "Allow OVD SM In" -Direction Inbound -Protocol TCP -LocalPort 1112 -Action Allow New-NetFirewallRule -DisplayName "Allow OVD RDP In" -Direction Inbound -Protocol TCP -LocalPort 3389 -Action Allow # Outbound rules New-NetFirewallRule -DisplayName "Allow OVD SM Out" -Direction Outbound -Protocol TCP -RemotePort 1111 -Action Allow New-NetFirewallRule -DisplayName "Allow OVD FS Out" -Direction Outbound -Protocol TCP -RemotePort 445 -Action Allow
Template Creation Steps
- Deploy an instance from the desired Windows Server template or install from an ISO.
- Install desired applications, Windows Updates, configure settings as needed.
- Install the RDS host server role. This can be done via the Server Manager MMC or Powershell:
Install-WindowsFeature RDS-RD-Server -
Reboot the VM following the installation of the RDS role.
Important
You MUST reboot the server after installing the RDS host role and BEFORE installing the OVD Application Server.
-
Download and install the OVD Application Server EXE or MSI. Enter the IP or FQDN of your session manager, install the print drivers if prompted, and reboot after the installation. The current version is below as of 8/22/2025
# EXE
https://archive.inuvika.com/ovd/3.4.2-526da687c5/Inuvika-OVD-3.4.2.7491-ApplicationServer.exe
# MSI
https://archive.inuvika.com/ovd/3.4.2-526da687c5/Inuvika-OVD-3.4.2.7491-ApplicationServer.msi
Important
You must make sure the OVD Slave Server Service is running before proceeding sysprep and shutting down the VM.
-
Log in to the OVD Session Manager Admin Console and navigate to Servers > Unregistered Servers.
- Click the green "Register as a Template" button to register your template and adjust further settings accordingly.
-
Run sysprep and shutdown the VM i.e. with
%WINDIR%\system32\sysprep\sysprep.exe /generalize /oobe /shutdownNote: if sysprep fails, you may need to look at removing the Microsoft Edge AppX packages via Powershell:
Get-AppxPackage -AllUsers | Where-Object {$_.Name -like "Microsoft.MicrosoftEdge*"} | Remove-AppxPackage -AllUsers -
Once the VM is fully powered off, in Opencloud, navigate to Instances > (VM NAME) > Volumes.
- Click on the root disk. In the actions pane on the upper right, select the option all the way to the right to "Create Template from volume"
Configure Template Provisioning
These steps will guide you through the process of configuring the newly created template in the session manager so it can be used to deploy session hosts. This guide assumes you've already completed the steps in "Opencloud DaaS Provisioning" to get a provisioning server configured with the requisite API credentials.
- Log in to the session manager UI and navigate to Servers > Registered Servers. In the "Provisioning Templates" section, click the name of your template.
- In the configuration page for your template, scroll down until you see the Terraform Configuration section. Ensure that the correct Platform that you created in the provisioniong section is selected.
- Set the VM name prefix to whatever you would like. If you set that value to 'rd-host-', the first session host that's created will be named 'rd-host-001', the second would be 'rd-host-002', and so on.
- Set the service offering field to the value of whatever compute offering you would like this session host to use. The options can be found under Service Offerings > Compute Offerings in Opencloud. For example, if you wish for each template to have 4x vCPU and 8GB of RAM, you would enter "CD-I-4-8" in this field.
-
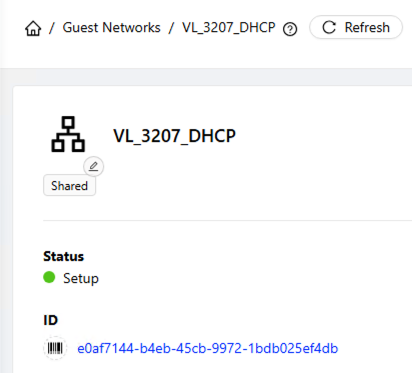
To populate the network ID field, navigate to Networks > Guest Networks in Opencloud and click on the network you wish to use. Click on the ID to copy the value, and paste this value into the field.
-
For "Template", enter the exact name of the Opencloud session host template you prepared previously. The list of your templates can be found under Images > Templates in Opencloud.
- For "Zone", enter the name of the zone you wish to use for hosting these session hosts. I.e. "us-mi-abh-01" or "us-co-eng-01".
- Click save, and then click "Test" to make sure your API credentials are able to be used.
- Click the "Advanced" link, and in the Terraform window, underneath the zone line, add the following line:
!!! warning "Important" Replace "100" with the desired size in GB for the root disk, if desired, and note that this value must be set no lower than the value set on your template.
root_disk_size = "100" - If you want the session manager to be able to delete instances from Opencloud when scaling down, add the following line:
expunge = "true" - If this line is not added, the session manager will simply power down the instance, and you will need to manually delete it from Opencloud. An example configuration with both of these changes is below:
{% set vm_name = prefix|tag + "%03d" % (counter) %} resource "cloudstack_instance" "{{ name|e }}" { name = "{{ vm_name|e }}" display_name = "{{ vm_name|e }}" service_offering = "{{ service_offering|e }}" network_id = "{{ network_id|e }}" template = "{{ template|e }}" zone = "{{ zone|e }}" root_disk_size = "100" expunge = "true" } output "{{ name }}" { value = { "ip" = cloudstack_instance.{{ name }}.ip_address "display_name" = cloudstack_instance.{{ name }}.name } } - With these changes made, click Save.
- If you wish to confirm that these changes work, scroll down and click the "New Instance On Demand" button. This will create an instance from the session host and confirm that all of the settings you defined are valid.
- Change other settings for this template as-needed, and when complete, make sure that it is switched from maintenance mode to production mode.